Sunday, August 26, 2012

Letter I


Here is another design team post for My Cricut Craft Room. Today, the letter of the day is "I." My project is simple, but can be used for more than one occasion, event, etc. The ice cream part opens, so you could write a message like a card, or use it to fill out information for a birthday invitation, etc.


Like I said, this project is simple which is great when you're trying to mass-produce things like invites.

The base to the ice cream popsicle is a shape I manipulated in CCR using the Chore Chart Lite Cricut cartridge. It's very easy to turn a square into a rectangle. Once I got the general size I wanted it to be, I copied and pasted the image to make an exact replica. I welded the two pieces together to form a little card, so to speak. Then, I made two smaller rectangles for the "layer" on top to make it look more 3-dimensional. I inked all the brown pieces with Memento rich cocoa ink to help them stand out.

I freehand cut out the popsicle stick shape, and scored some lines into it to give it some interest. I was going to make that be the card itself, but it seemed a little flimsy so I just added the whole thing to a card stock base with foam tape. Plenty of space inside the ice cream card or on the back for a message or invite details.

Cut sizes:
Popsicle shape - 3.75
Popsicle layer (x2) - 0.694

To see more projects like this, please visit My Cricut Craft Room.

Wednesday, August 22, 2012

Theme Day Thursday - Apples or Fruits


*If you're looking for the Aviation Blog Hop, please click here.*

Happy happy happy Thursday! Only one more day and it will be the weekend. I hope you all have some fabulous plans. Let's get down to business. I have another project to share with you for My Cricut Craft Room. Today is Theme Thursday, and the theme was apples or fruits. I have a stamp that I knew would be super cute, so I went with a pear theme. Please continue reading to see how I made my project.


When it comes down to it, this project is fairly simple. I only used one cartridge, and that is Home Accents. I welded two pear shapes together and the overall size is 4.625 by 4.069. Then, I cut the layer for the two pieces. The layers are cut at 2.556 and 2.292 and layered appropriately. I used creamy brown chalk ink on some of the layers to help them stand out.


If you've been to my blog recently, you know I've been obsessed with dry embossing and sanding. Yep, you guessed it - I did it again. Next, I stamped my sentiment using an Inkadinkadoo stamp, inked the edges with that same creamy brown chalk color, then adhered it to my project.


I wrapped some brown embossing thread around the whole base a few times for some added interest. That's it. All there was to it, I told you it was a fairly simple project!

To see more projects like this, please visit My Cricut Craft Room.

Aviation Blog Hop


It's a plane! It's a bird! No, it is a plane and this is the Aviation Blog Hop to celebrate National Aviation Day. Our talented crafters took to the sky to create their project for this hop and I hope you will stop by all the blogs, see their high flying projects and leave them a comment.

This blog is hosted by Lorby's World and Jearise will have a give away going on at her blog so please start there.

My project today is a fighter jet "fly high" card.


This card is a standard A2 sized card made out of white card stock. The black layer and blue layers decrease in size by 1/4 of an inch. I ran the blue layer through the Cuttlebug seeing spots embossing folder, then sanded it to give it a distressed look. Next, I adhered the fighter jets I cut at four inches from the Cricut Cartridge Stand and Salute. The jets are adhered with foam tape. I then stamped the "fly high" sentiment, layered two pieces of cardstock behind it, and my card is done.

Thank you for stopping by and please fly on over to Lynne's blog to see her project.

If you happen to get lost along the way, here is the entire line up:

Tanya - www.blahvacuum.blogspot.com
Sandra- http://365daysofcricut.blogspot.com/
Lucy ~ http://love2createitall.com
Ashley - http://thebloghopprincess.blogspot.com
Melissa - http://papershenaniganz.blogspot.com/ *YOU ARE HERE*
Lynne ~ http://slasewcraftiness.blogspot.com/
Jessi- http://mylifeinartsncrafts.blogspot.com
Jearise - http://lorbysworld.blogspot.com
Cicily - http://pinkdalmationscrapper.blogspot.com/

Thursday, August 16, 2012

Scrapbook Friday - Fall Mini Album


Today is Scrapbook Friday at My Cricut Craft Room, and today my design team sisters and I were to make a mini album. This is not something I do often, but I think it's safe to say I'm now addicted to minis. I knew I wanted to do something fall themed because it's my all time favorite season and time of year. If you'd like to see how I made this project, please continue reading.


I wanted to keep the "waterfall" type album fairly simple on purpose, because I didn't want to detract from the actual concept of the letters/shape of it being the focus, if that makes sense. There's no froo froo elements on this album - simple embellishing, etc. You can do as little or as much as you'd like. As always, I first created this in CCR.


I used two layers of thin chipboard as the base and glued them together. By the time I got my layers of cardstock on top, the album is sturdy and not going to fall apart anytime soon. I used simple binding rings to hold it all together. I also sanded the edges.


I started with a rectangular shape from CCR Basics for each of the pages. For each of the letters, the rectangles get bigger in order to create the "waterfall" effect.

Here are the rectangle measurements from smallest to largest. Later, we'll weld the letters:

1. 1.542 by 3.431
2. 2.486 by 3.431
3. 5.014 by 3.431
4. 5.866 by 3.431

Next, I welded the SHADOWS of the letters using a font from Birthday Cakes, to their base rectangle shape. You can spell out anything you want, but for mine I spelled "fall." Here are the measurements for the shadows of the letters:

f - 2.389 by 3.389
a - 3.042 by 3.361
l - 0.931 by 3.458 *cut twice*


Next, I cut out the layers of the letters and dry embossed the top layer with a damask Cuttlebug embossing folder. I then sanded it to let the white core come through. I am obsessed with this technique lately. I think it gives a beautiful result, without a lot of work. Next, I adhered all the layers together and added them to the bases. Like I said before, I didn't want to do a whole lot of embellishing to this, so I added some jute to the letters, two strips of ribbon on the binding, and called it done.


I hope this gives you some ideas to make your own mini album!

To see more projects like this, please visit mycricutcraftroom.blogspot.com

Wednesday, August 8, 2012

Theme Day Thursday August 9, 2012 Bedtime


Not going to lie, today's "theme" boggled my brain. I had no idea what I was going to do for my project until I heard "twinkle twinkle little star..." on a TV commercial. Then it hit me! I love it when inspiration comes from every day things. So, here is my bedtime themed project! Hope you enjoy.


The light blue card stock base is 4 3/4 by 5 3/4. I rounded the edges with a corner punch. The first layer is from Spring Holiday Cards, and it is the Background 4 cut. It is cut at 4.319. I ran it through the Cuttlebug using the Seeing Spots embossing folder, and then lightly sanded it to make the dots "pop." the card stock I used has a white core, which really helps. If your card stock doesn't have a white core, the sanding won't be that noticeable.


I cut the cloud shapes using Home Accents. The cut has the word "dream" on it, which I didn't want, so I hid it using Cricut Craft Room. They're cut at 3.181. The words "star" and "little" are welded to the clouds using CCR. The font is from Plantin Schoolbook, and it's cut at approx. .792.


"Twinkle twinkle" is from the nursery rhyme cut on the Word Collage cartridge. I used CCR to hide all the other words on the cut, and placed the words I wanted on the cloud so they would be welded together.

The stars I got from Chore Chart Lite, and I cut them in two different sizes - 1, and 1.625.


I tied all the banner pieces together using blue embroidery thread, but you could use just about anything to tie them together. I really love the way this project turned out. Goes to show, inspiration literally IS everywhere.

Hope you enjoyed today's project, and make sure you stop by MCCR to see what my Design Team Sisters created for you today as well!

Saturday, August 4, 2012

August 100 Cartridge Blog Hop with My Cricut Craft Room - Day TWO :)


Welcome to Erica's Craft Room
100 Cricut Cartridge Blog Hop Day ONE


You should have started at http://mycricutcraftroom.blogspot.com/ if not, please start at the beginning


Welcome to My Cricut Craft Room's August 100 Cartridge Blog Hop

Collectively the design team uses over 100 different Cricut Cartridges in their projects during the two days of this hop. Sunday the new members of the design team will be announced and some have even made a project to share with you!! What an exciting weekend!!

As special treat enjoy 10% off of your total purchase with Erica's Craft Room Store.
Use the code AUGUST to see 10% off of your total purchase (No exclusions)


Good morning (or afternoon) everyone! I so hope you enjoyed everyone's projects from day one of the hop! I hope you continue to hop along with my Design Team sisters and I, as we continue with the second day of fabulous projects.

I have created two cards, and one home decor piece for you today. The main cartridges I used are Plantin Schoolbook, Spring Holiday Cards, and Cricut Cakes Birthday Cakes. My post is a bit picture heavy, but I wanted to make sure I showed you everything. 

First up is a cute gender neutral birthday card. The card base is a standard A2 size - Cut at 4.25 by 11; scored and folded at 5.5, to form a 4.25 by 5.5 inch card base. The red mat is 4 by 5.5, and the polka dot mat is 3.75 by 5. I inked around the edges using Memento rich cocoa ink. The papers I used for this card are from the Imaginisce Birthday Bash paper pad.


For this card, I used the Cricut Cakes Birthday Cakes cartridge. I cut the shadow for the bird at 3 inches, the bird at 2.9, and it's layers at 2 inches. I adhered everything together, and then matted him on a piece of red card stock that was just a little larger. I then used a white gel pen for faux stitching on this piece.


Next, I moved on to the balloons which I cut three of at 2.944 inches. I cut the tails off, because I knew I wanted to use my own jute instead of a paper tail.


I then added some silver glitter to the red polka dots in the background paper for some added interest. This card comes together quickly, but is super cute and definitely something you could mass produce.


For my next project, I used Spring Holiday Cards, and Plantin Schoolbook. This is a cute back to school card.


I used two of the Background 3 shapes from Spring Holiday Cards welded together using Cricut Craft Room to make my shaped card base. The card base is 4.125 inches wide by 10.25 inches tall. I used the Background 2 shape cut at 3.403 inches wide, and 4.264 inches tall for the layer.


For the tag, I used Plantin Schoolbook and cut it at 2.139. I also cut two apple shapes from the same cartridge at 1.528. The reason I cut two, is because I wanted the stem to be a different color than the apple. I cut the stem off the red piece, and just adhered it to the brown piece so they would look more realistic. I then adhered the apple to the tag.


I then used some number stamps to stamp a little border for the bottom of the card. I stamped the number 2 on a piece of colored cardstock, to make it stand out. I then used letter stickers to spell out the rest of my "back 2 school" sentiment.


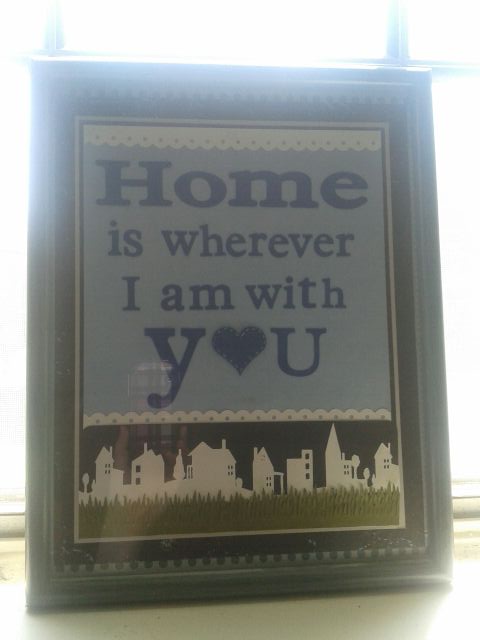
My third and final project is a home decor item using Plantin Schoolbook.


For the houses at the bottom, I used the "city" image cut at 2.264. I ended up needed two cuts piecing them together to form a continuous house line.

I cut the grass three times at 0.0667 and layered them to look "full."

The word "Home" is using the Roly Poly feature cut at 1.236. The word "you" is using the Regular Plantin Schoolbook font, cut at 2.139. I also used a heart from the cart in place of the "o" in "you" and sized it accordingly. For all the other letters in the words, I used the same regular Plantin Schoolbook font and cut them at 0.736.

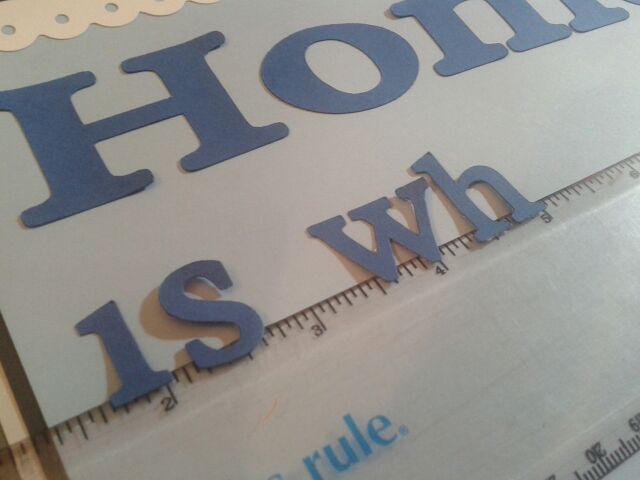
Tip: I ran all the little letters through my Xyron sticker maker, to make it easier to adhere them.


If you have trouble lining your letters up to make them straight like I do, then lightly stick them to a ruler to help you get them straight and spaced how you want them before you stick them down to your project. You can easily move them around on the ruler until you get them exactly as you want them.


Those are my projects for you today, I hope you enjoyed! Please let me know if you have any questions, and as always make sure you're a follower to keep up with all my latest projects!


Next, you should go to Erica's Projects http://ericasprojects.blogspot.com/


If you get lost along the way, here is the entire line up - Day TWO:


  • MCCR http://mycricutcraftroom.blogspot.com/

  • Nanne http://nannes-creations.blogspot.com/

  • tess www.sassycricutcrafting.com

  • Jamie M http://craftygirl21.blogspot.com

  • Janet http://janetscreativeworld.blogspot.com

  • Mary http://Mary-fortheloveofart.blogspot.com

  • Lisa Ch http://lisacustomscrapbooking.blogspot.com

  • Ashley http://especiallymade.blogspot.com

  • Jamie http://babyjaydensmommy.blogspot.com/

  • Melissa http://papershenaniganz.blogspot.com

  • Erica's Projects http://ericasprojects.blogspot.com/

  • Marji www.fstampaholic.blogspot.com

  • Nadja http://nadjarobbins.blogspot.com/

  • Andrea http://creativedesignsbyandrea.blogspot.com

  • Robin http://create-a-latte.blogspot.com/

  • Christina http://cema1cema.blogspot.com

  • Jodie http://jodiesscraplab.blogspot.com/

  • Mona http://scrapbookingforjoy.blogspot.com

  • Ava http://scrapbookdesign4u.blogspot.com

  • Jessica W http://www.craftinandstampin.blogspot.com

  • Blog Candy http://ericasblogcandy.blogspot.com/


  • Thanks for hopping!